Before you begin: Before you create a recurring payment plan, first add the patient’s card to the Vault. Taking this step will make it easier to make any changes to the payment plan later. Recurring payment plans cannot be edited. To make changes to a recurring payment plan, you will need to deactivate the plan and create a new one. If the card is stored in the Vault, you can retrieve it to create a new payment plan instead of contacting the patient again for the card information.
Create a Recurring Payment Plan
There are two tabs to choose from when creating a recurring payment plan:

- By Balance Due
- This option calculates the installment amounts for you, based on the total amount due and the number of installment payments that the patient will make.
- When to use this tab:
- If the total due is an uneven amount. To divide the uneven amount, the system will make the first payment larger, and the remaining payments will be split evenly.
- When to use this tab:
- This option calculates the installment amounts for you, based on the total amount due and the number of installment payments that the patient will make.
- By Installment Amount
- This option lets you set the installment amount and number of installments that the patient will make.
- When to use this tab:
- If the total due is an even amount.
- To collect one payment on a future date.
- To collect dues for memberships, packages, and other subscriptions on a set weekly or monthly schedule.
- When to use this tab:
- This option lets you set the installment amount and number of installments that the patient will make.
By Balance Due
- This step varies based on whether there is a Vault record available.
- Existing Vault Record Option: Search for the Vault record, and then click the icon under Recurring.
- No Vault Record Option: To create a Recurring payment plan without a Vault record, click Recurring in the left menu, and then click Add.
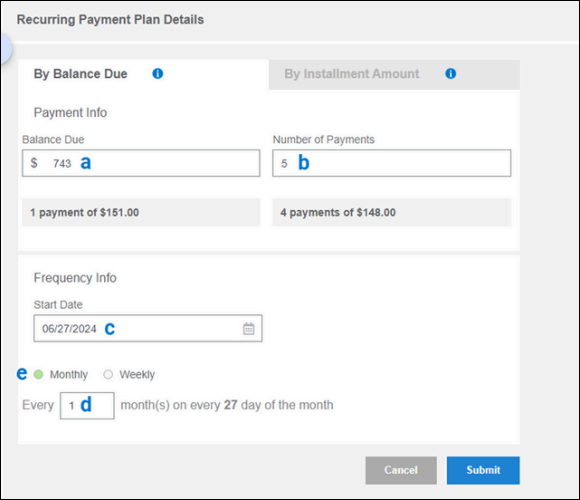
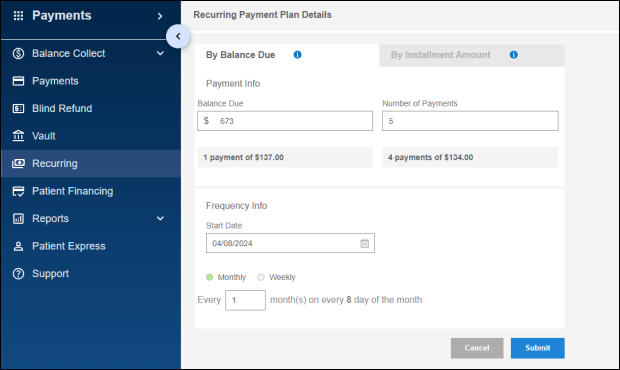
- On Recurring Payment Plan Details, for Balance Due, enter the full amount that the patient owes.
- For Number of Payments, enter the number of payments to divide the full balance between.
- Under Frequency Info, select a start date, choose either monthly or weekly frequency, and then specify the day to charge. For example, you might set the recurring payments to run every other month on the third day of the month, or every other week on Thursdays.
- Click Submit.
- Enter the patient’s payment and billing information, and then click Submit.
- If the details on the Confirm Creation of Recurring Payment Plan message are correct, click OK.
- On Pre-Authorized Healthcare Form (PAHCF), enter the patient’s email address, a descriptive subject for the email, and an optional email body to explain that the signed form is required to consent to ongoing installment payments.
- Click Email or Print.
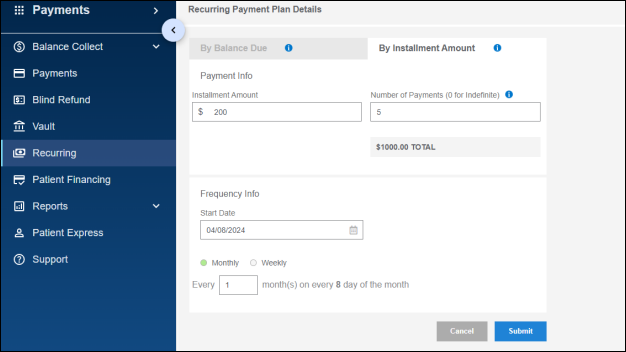
By Installment Amount
- Click the icon under Recurring from the Vault record or click Recurring > Add from the main menu.
- For Installment Amount, enter the amount that will be paid in each installment.
- For Number of Payments, enter the number of installments that will total the full balance due.
- Under Frequency Info, select a start date, choose either monthly or weekly frequency, and then specify the day to charge. For example, you might set the recurring payments to run every other month on the third day of the month, or every other week on Thursdays.
- Click Submit.
- Enter the patient’s payment and billing information, and then click Submit.
- If the details on the Confirm Creation of Recurring Payment Plan message are correct, click OK.
- On Pre-Authorized Healthcare Form (PAHCF), enter the patient’s email address, a descriptive subject for the email, and an optional email body to explain that the signed form is required to consent to ongoing installment payments.
- Click Email or Print.