
You can create a Recurring payment plan in Bridge Payments from a card stored on file or from a card not stored on file. There are two places where you can create Recurring payment plans:
- Vault: For a card that's already stored on file.
- Recurring: For a card that is not yet in the system.
Interactive Product Tour
To follow an interactive product tour on the process, see Create Recurring Plans.
Text Instructions
There are two tabs to choose from when creating a Recurring payment plan.
| Use | When |
| If the total due is an uneven amount. | |
|
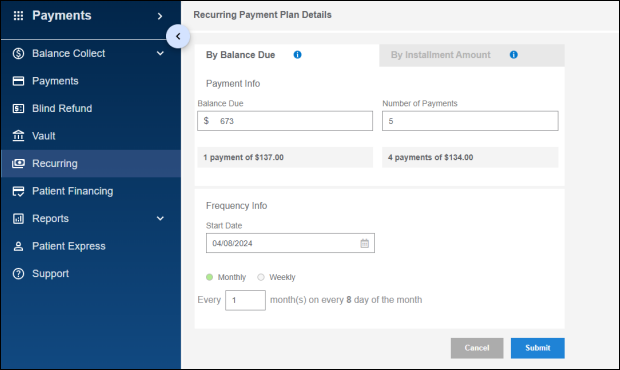
- This step varies based on whether there is a Vault record available.
Pre-existing Vault Record: Search for the Vault record, then click the icon under Recurring.
No Vault Record: Click Recurring in the left menu, then click Add. - Enter the full amount that the patient owes for Balance Due.
- Enter the number of payments to divide the full balance between for Number of Payments.
- Select a start date, choose either monthly or weekly frequency, and then specify the day to charge under Frequency Info.
Example: You might set the recurring payments to run every other month on the third day of the month, or every other week on Thursdays. - Click Submit.
- Enter the patient’s payment and billing information, then click Submit.
- Confirm the details on the Confirm Creation of Recurring Payment Plan message are correct, then click OK.
- On Pre-Authorized Healthcare Form (PAHCF), view, print, or email the PAHCF agreement.
To view or print the PAHCF: Click the Print button—a print preview window will appear for you to view the PAHCF or choose to Print it.
To email the PAHCF: Enter the patient’s email address > enter a descriptive subject for the email > if desired, add a custom message to explain that the signed form is required to consent to ongoing installment payments > click Email.
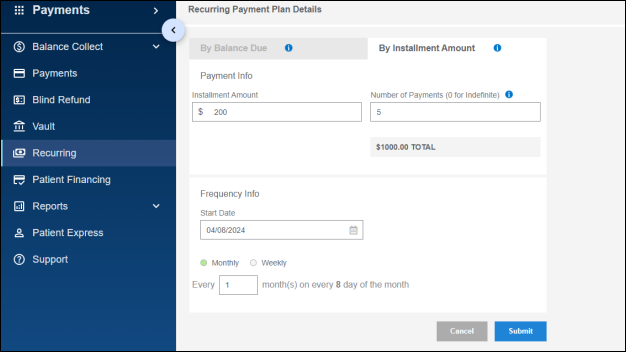
- This step varies based on whether there is a Vault record available.
Pre-existing Vault Record: Search for the Vault record, then click the icon under Recurring.
No Vault Record: Select Recurring in the left menu, then click Add. - Enter the amount that will be paid in each installment for Installment Amount.
- Enter the number of installments that will total the full balance due for Number of Payments.
- Select a start date, choose either monthly or weekly frequency, and then specify the day to charge under Frequency Info.
Example: You might set the recurring payments to run every other month on the third day of the month, or every other week on Thursdays. - Click Submit.
- Enter the patient’s payment and billing information, then click Submit.
- Confirm the details on the Confirm Creation of Recurring Payment Plan message are correct, then click OK.
- On Pre-Authorized Healthcare Form (PAHCF), view, print, or email the PAHCF agreement.
To view or print the PAHCF: Click the Print button—a print preview window will appear for you to view the PAHCF or choose to Print it.
To email the PAHCF: Enter the patient’s email address > enter a descriptive subject for the email > if desired, add a custom message to explain that the signed form is required to consent to ongoing installment payments > click Email.
Best Practices
- Before you create a Recurring payment plan, first add the patient's card to the Vault.
Taking this step makes it easier to apply changes to the payment plan later. - If the patient's card is stored in the Vault, use it to create a new payment plan instead of contacting the patient again for the card information.
Helpful?