
The Vault is where you can store card information securely for future payments. Bridge™ Payments offers three ways to do this:
- Add a card to the Vault during transactions.
- Add a card directly in the Vault (outside a transaction).
- Send a Payment Authorization form via email or text for the patient to place their own card on file.
This article covers the second method: adding a card directly to the Vault outside of transactions.
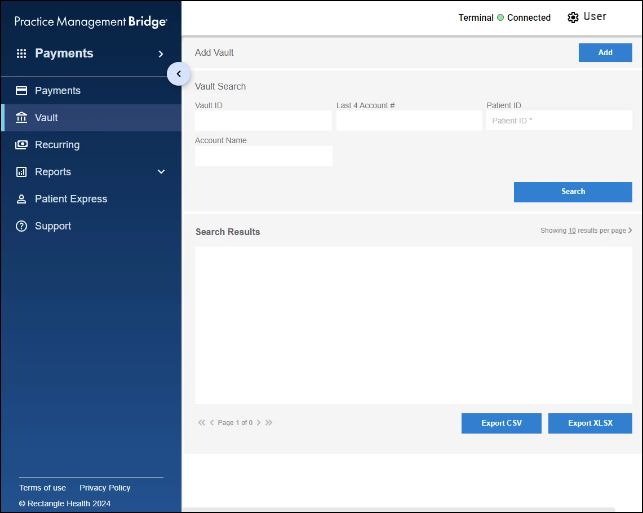
Instructions
- Click Vault in the left menu.
- Click Add to create a new Vault record.
- Select your Merchant Account (if you have multiple locations) and enter a Vault ID.
For the Vault ID, use a unique identifier, like the Patient ID from your electronic medical records (EMR), to associate the card to the patient and easily find the payment method in the future. If a patient wants to save multiple cards, use a suffix like "-1" and "-2" at the end of each Vault ID.
Do not use special characters or spaces in Vault ID. The only accepted characters are letters, numbers, dashes (-), and periods (.). - Enter a $ Maximum Amount (maximum amount to be charged) and choose whether the maximum amount applies to All visits this year or This visit only.
The maximum amount you enter and the selection for "All visits this year" or "This visit only" are included on the Pre-Authorized Healthcare Form (PAHCF) that the patient signs.
Tip: Choose All visits this year unless the card is being saved specifically for a single visit's balance. Otherwise, the PAHCF may not be valid for future visits.
Example: If a patient's co-pay is $30 each visit, you could set the $ Maximum Amount to $30.00 and specify All visits this year.
Example: If you plan to collect a post-insurance balance for a procedure, you could set the $ Maximum Amount to the post-insurance balance and specify This visit only.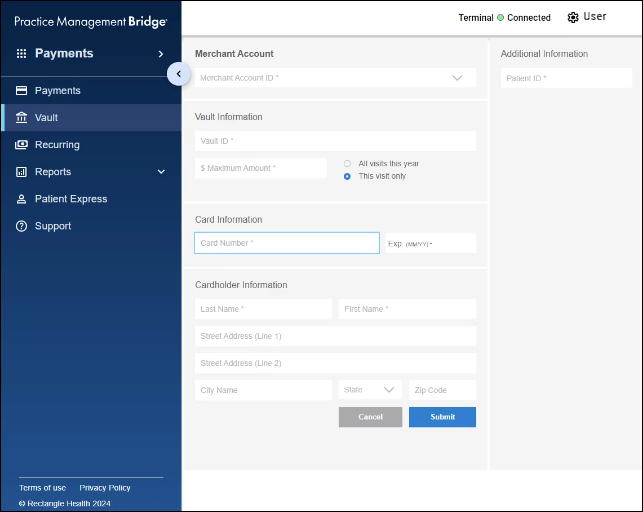
- Enter the cardholder information.
Required fields are:- Card Number
- Expiration
- First Name
- Last Name
- Click Submit to prompt the cardholder for their signature.
If Bridge Payments is connected to a card reader, the cardholder is prompted to sign for the PAHCF. If a card reader is not connected, you can collect a signature on a printed PAHCF for your records. - After signing, the Pre-Authorized Healthcare Form (PAHCF) screen will appear for you to print or email the PAHCF to the cardholder.
To email the PAHCF: Enter the patient's email address > add a descriptive subject for the email > if desired, add a custom message to explain that the signed form is required to consent to ongoing installment payments > click Email.
To print the PAHCF: Click the Print button—a print preview window will appear for you to view the PAHCF or choose to Print it.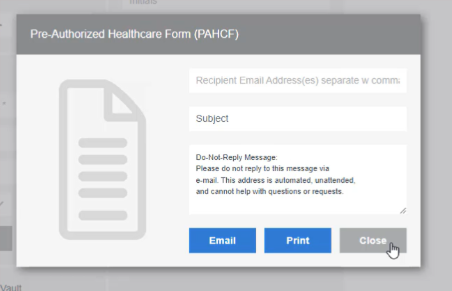
To print more copies of the PAHCF, see Email or Print the Pre-Authorized Healthcare Form.
Helpful?